

If you were to search for these extensions in your Chrome Web Store, you will notice that they are checked off and appear as installed in the top right corner of the Chrome Browser.


These two extensions become a double-whammy when students are reading and annotating content online. With the Google Dictionary installed, all students need to do when they come across a word they are unfamiliar with is to simply double click on the word. A yellow bubble pops up above the word that defines the word, allows for the word to be sounded out by the computer, and allows for more options to be viewed as alternate definitions, synonyms, and antonyms.

Even as an adult learner, I save all sites that I bookmark onto Diigo as a way to collect and organize my work and online reading. That way, no matter where I am and what internet browser I am using, I can access every site I have bookmarked. Here's a few helpful tips and screenshots for the first-time Diigo user.
Diigo Social Bookmarking Directions for Students
Diigo Social Bookmarking Directions for Teachers
Diigo Social Bookmarking Directions for Students
Diigo Social Bookmarking Directions for Teachers
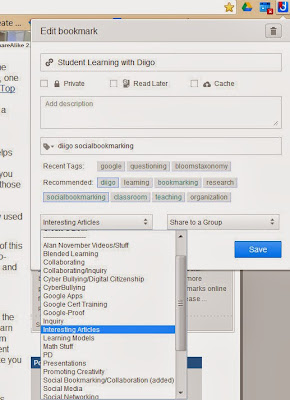
1. When you're on a site that you want to bookmark and save into Diigo, simply click on the blue Diigo icon and an "Edit Bookmark" window will pop up. Click "Save" and add the site to a list (note: with your first time you'll need to choose "Create a List", name it, "Add" it, and save it). You can add a description and click on tag-able words to categorize the site.
2. You can also highlight and write notes on the text by clicking on the "Annotate" button (note: you cannot edit a PDF). In addition, this pop-up window also contains tools for you to take a screen shot, share the page, and go directly to your Diigo library.

3. When you click Annotate, a three-icon toolbar will appear on the right side of your website. Click on the pen and click anywhere on the text to highlight. You can also click on the sticky-note to add notes of your own to the page (you can drag those around the page too-not limited to just placing in one location).

4. When you go to your library, you will see a mega list of your bookmarked pages, as well as any notes you may have taken of highlights of the text you've done on the page. When you click in the area of that article, you will also notice 5 icons appear on the right side (the last one includes a Send-to and Get Annotated Link options. You can choose to send the site to others with or without your notes on them).

5. Finally, on the left sidebar of your Diigo personal library page, you'll notice a list of your tags (words that categorize your articles) and the lists you've created within Diigo. These become extremely helpful when you've been using the tool for awhile and need to search for something!


0 comments:
Post a Comment